Background
Luminoso provides virtual appliances to run Luminoso Daylight in clients’ data center. Follow these instructions to install the virtual appliance so you can configure and use the product.
Launch a new instance from the AMI shared by Luminoso
Luminoso offers several methods for delivering on-site images to clients. This document assumes you provided Luminoso with your AWS account number and that the AMI is shared with your account.
- Log into your AWS Account and navigate to EC2. The EC2 Dashboard opens.
- Under Images select AMIs and search for the AMI using the AMI ID that Luminoso provided.
- Select the AMI that matches your build number and click Launch to open the Launch Wizard.
- Choose an Instance Type:To enable Concept-Level Sentiment in your Daylight instance, you must specify a
g4dn.xlargeinstance type for minimum processing requirements.For quicker Concept-Level Sentiment processing, chooseg4dn.12xlarge.The minimum requirements for Luminoso deployments are 4vCPUs and 16 GiB of RAM. This requirement is for relatively low workloads. We recommend using the r family because it is memory-optimized and better for large amounts of text data. Please upgrade your instance size based on workload and performance expectations if needed. If you select an instance type below the specifications outlined above Luminoso functionality will not work as intended. This configuration will not include Concept-Level Sentiment. - Click Next: Configure Instance Details. The Step 3: Configure Instance Details page opens.
- Use the options to configure your instance based on your company requirements.
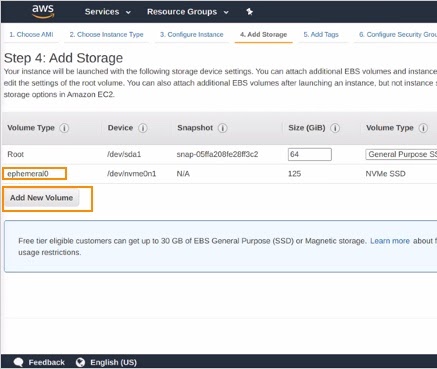
- Click Add New Volume to add and configure the data disk.
Warning: For installations with Concept-Level Sentiment, ignore the ephemeral0 volume. The ephemeral0 volume type cannot be treated as a data disk for Daylight, so you must still add a new volume.For new installations, new disk size depends on the number of projects processed. Your Luminoso Account Manager is responsible for communicating the recommended size of the data diskFor upgrades, enter the Snapshot ID of the previous instances’ data volume snapshot so the new system starts with a data volume based off that snapshot. - Select “Delete on Termination” or “Encryption” based on your company requirements for the data disk added in Step 7.
- Click Next: Add Tags. Step 5: Add Tags opens.
- Add tags as applicable to your organization. If you don’t need tags, skip this step. Within AWS, tags allow you to place arbitrary labels on resources that help you report. If you have a tagging policy that says “every resource needs to have a tag” then you can see what resources everyone is using
- Click Next: Configure Security Groups.
- Configure security groups as required by your organization.
- Click Review and Launch. The Review Instance Launch page opens.
- Review the details and confirm that the settings you selected are correct.
- Click Launch. A Select an existing key pair or create a new key pair window opens.
- Select Proceed without a key pair. The Luminoso Daylight image is prepopulated with credentials that your CSM provides.
- Click Launch Instances. Your instance begins the launch process.
- For configuration steps, refer to the appropriate Luminoso Daylight On-site product documentation.
AWS AMI Upgrade Instructions
- Shut down the previous on-site VM.
- Click Volumes and select the data volume of your old instance.
- Go through the steps on the Create Snapshot page. Click Create Snapshot and record the snapshot ID provided on the page.
- Follow the steps in the installation guide to create a new on-site VM. Instead of adding a new data disk, attach the snapshot from the previous on-site version.Note: If you are upgrading to use Concept-Level Sentiment, make sure to select an instance type that uses GPU.On the Add Storage page, select a size that is either the same as or larger than your previous data disk.You must change the device name when you add this disk.In the Device column, use the menu to change
/dev/sdb to /dev/sdf. - Start the new VM and connect via ssh with admin credentials. The system runs any necessary data migrations. If the upgrade involves large schema changes, or if you have many existing projects, this may take a while. We recommend running it overnight.
Note: The new admin password should work, so you don’t need to remember the admin password for the previous machine. - Check the configuration to ensure that your settings were imported correctly.
- Start the application.