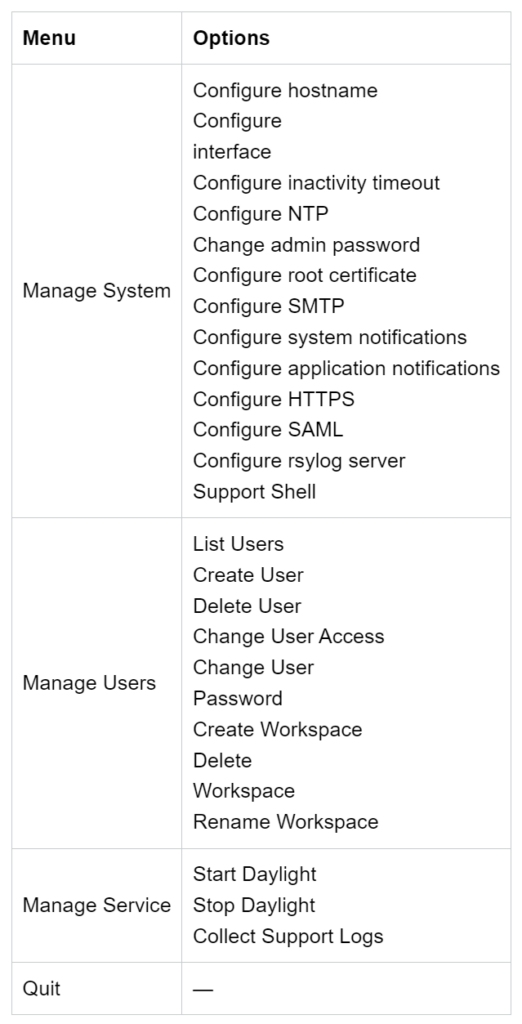
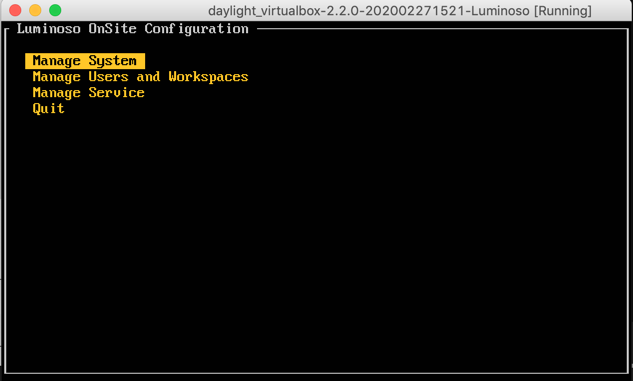
After installing the Luminoso Daylight On-site Virtual Appliance, connect to it via ssh using the username ‘admin’ and the associated password that Luminoso support provided. After you log in, a menu appears where you can configure various properties of the machine.
The following steps configure the On-site Appliance to match your data center environment. For example, the network card defaults to DHCP. If your data center environment requires static IPs, you can change it using the Manage System menu in the On-site Menu.
Other system configuration options:
Update Luminoso Daylight Settings:
To complete any of the following tasks, you must log in to the on-site virtual machine using admin credentials.
Make system changes
- Select Manage System from the menu, select the appropriate menu option, and make any necessary changes,
- Click OK.
Change Hostname
- Open Manage System -> Configure Hostname
- Change the fully-qualified domain name to your preferred domain name.
- Select OK.
Note: If you have DHCP and are changing the hostname, you will have to reboot the machine to report the new hostname to the DHCP server.
Change DHCP to Static IP
- Open: Manage System -> Configure Interface
- Change “DHCP” to “Static”.
- Enter the desired IP address, Netmask, Gateway, and DNS Server. These fields are only valid if you selected “Static” above.
- Select OK.
Change the Inactivity Timeout
- Open Manage System -> Configure Inactivity Timeout
- Update the Inactivity Timeout and Maximum session length values in seconds.
- Select OK.
Use an internal NTP server
- Open Manage System -> Configure NTP
- Change “DHCP” to “Static”.
- Enter the fully-qualified domain name of the NTP server you wish to use.
- Select OK.
Note: You cannot use NTP via DHCP if you are not using DHCP to assign an IP address.
Change admin password
- Open Manage System -> Change admin password
- Change the admin password
- Select OK.
Note: You cannot log into the Daylight Web Interface as “admin”, but must log in as one of the created users (see “Workspaces and Users”).
Configure root certificate
- Open Manage System -> Configure root certificate
- Upload your root certificate to the Virtual Machine via sftp using a command similar to
sftp certcopy@[hostname]:ssl <<< '$put [/path/to/certificate.pem]'
If prompted for a password, use the admin password. - The new certificate should appear in the list below “Clear existing certificate”; select it.
- Select OK.
Configure SMTP
- Open Manage System -> Configure SMTP
- Enter the SMTP host name and the SMTP port.
- Select “Use StartTLS” and “Require valid certificate” if you would like to encrypt your connection to the SMTP server.
- Enter the SMTP username and the associated SMTP password, if required by your SMTP server.
- Select OK.
NOTE: In order to use TLS, you may need to configure your root certificate.
Configure System Notifications
- Open Manage System -> Configure system notifications
- Enter the email address to which system alerts should be sent (probably your own email address).
- Enter the email address from which system alerts should be sent.
- Select OK.
NOTE: In order to have the Virtual Machine send alert emails, you need to have configured SMTP.
Configure Application Notifications
- Open Manage System -> Configure application notifications
- Enter the email address from which application notifications (for instance, “forgot email” notifications) should be sent.
- Enter the URL for the Luminoso Daylight UI, so that links will work in application notification emails.
- Select OK.
NOTE: In order to have the Virtual Machine send alert emails, you need to have configured SMTP.
Configure HTTPS
- Open Manage System -> Configure HTTPS
- Select “Enable HTTPS”.
- Upload your certificate and key to the Virtual Machine via sftp using a command similar to
$ sftp certcopy@[hostname]:https <<< $'put [/path/to/certificate.pem]'
If prompted for a password, use the admin password. - Your certificate and key should both appear in the lists below; select the certificate file in the “Select Certificate File” list and the associated key in the “Select Key File” list.
- Select OK.
Configure SAML
The Luminoso Daylight implementation of the SAML2 Single Sign-on Profile uses the HTTP Redirect (GET) and HTTP POST Bindings on our Single Login and Assertion Consumer Endpoints.
You must configure the Identity Provider to send the attribute lumi_username containing the user’s Luminoso Daylight username in the SAMLResponse sent to the Assertion Consumer Service upon login.
Each task assumes that you have logged in to the virtual machine using admin credentials.
- Open Manage System -> Configure SAML and select Use SAML.
- Select the SAML Response and Authentication Request signing and encryption options that match your policies and IDP configuration.
Note: If you select “Support password authentication in addition to SAML” local accounts and SAML accounts can log in. If you deselect it, only SAML users can log in to the system. - Enter the Identity Provider Entity ID, and Single Sign-on URLs.
You can get this information from your Identity Providers SAML 2.0 Identity Provider Metadata by looking for:- EntityDescriptor entityID=”[IDP Entity ID]”
SingleSignOnService Binding="urn:oasis:names:tc:SAML:2.0:bindings:HTTP-POST" Location="[IDP Single Signon URL]"dsig:X509Certificate
- Generate a public certificate and private key in PEM format for SAML using a command similar to:
$ openssl req -new -x509 -days 365 -nodes -out sp_cert.pem -keyout sp_key.pem- Ensure that all the file are world readable before uploading them by running a command similar to:
chmod 644 *.pem - Upload your identity provider certificate, newly generated certificate and private key to the Virtual Machine via sftp using commands similar to:
$ sftp certcopy@[hostname]:saml <<< $'put [/path/to/idp.cert|sp_cert.pem|sp_key.pem]'
If the system prompts you for a password, use the admin password. The new certificates and key appear in the list below “IDP Certificate File”, “SP Certificate File”, and “SP Private Key File” - Select the new certificate files and key.
- Select OK.

Send Logs to an rsyslog Server
- Open Manage System -> Configure rsyslog Server
- Enter the name of your rsyslog server.
- Select OK.
Start an instance of Daylight on-site
- Go to: Manage Service
- Select Start Daylight.
- Select OK from the popup, and then OK in the menu.
Note: It may take up to five minutes for the application’s services to fully start.
Stop an instance of Daylight on-site
- Go to: Manage Service
- Select Stop Daylight.
- Select OK from the popup, and then OK in the menu.
Collect Support Logs
- Go to: Manage Service
- Select Collect Support Logs. After the logs are collected, instructions on how to download them from the appliance appear on screen.
Daylight on-site: Workspaces and Users
To complete any of these tasks, you must log in to the on-site virtual machine using admin credentials.
Create a user
- Go to: Manage Users and Workspace -> Create User
- Enter a username and password.
Note: As a best practice, create a username using the user’s email address. This ensures that the user receives the correct notifications and alerts. If you create a user without an email address, you must add them to all workspaces using the on-site menu. - Select OK.
Note: Make sure you grant your users permissions (see next step). A user without permissions sees an empty page with no options upon login.
Create a workspace
- Go to: Manage Users and Workspace -> Create Workspace
- Enter the human-readable name of the workspace you wish to create.
- Select OK.
Grant/Change user permissions
- Go to: Manage Users and Workspace -> Change User Access.
- Enter the username of the user whose permissions you wish to change.
- For each workspace, check the permissions you wish to give the user.
- To remove permissions, use the space bar instead of the enter key.
- Select OK.
Note: Users with Organization roles have those permissions on all projects in all workspaces, though their permissions are not explicitly listed.
Change a user’s password
- Go to: Manage Users and Workspace -> Change User Password
- Enter the username of the user whose password you wish to change, as well as the new password.
- Select OK.
Delete a user
- Go to: Manage Users and Workspace -> Delete User
- Enter the username of the user you wish to delete.
- Select OK.
Delete a workspace
- Go to: Manage Users and Workspace -> Delete Workspace
- Select the workspace you wish to delete.
Note: To prevent accidental data loss, do not delete workspaces that contain projects. To delete this kind of workspace, start by deleting everything it owns through the UI. - Select OK.
Rename a workspace
- Go to: Manage Users and Workspace -> Rename Workspace
- Select a workspace and enter the new name.
- Select OK.
Proxy Settings
If your deployment requires the use of one or more http reverse proxies in front of Luminoso On-site, Luminoso recommends configuring any and all proxies so that requests may be up to 200 MiB in size. 200 MiB is the limit Luminoso imposes internally.
Read instructions in PDF form.