For all Luminoso on-site deployments minimum requirements
The minimum requirements for Luminoso deployments are 4vCPUs and 16 GiB of RAM. This requirement is for relatively low workloads. Please upgrade your instance size based on workload and performance expectations if needed. If you select an instance type below the specifications above Luminoso functionality will not work as intended.This configuration will not include Concept-Level Sentiment.
To access Concept-Level Sentiment in your Luminoso on-site virtual machine, you must at minimum attach a GPU that is appropriate for your instance type.
Luminoso Compass instructions
Luminoso Compass install and update instructions have not changed from v2.3. Use the most recent credentials your CSM provides to you and follow the v2.3 instructions for your hosting type.
For AWS and Azure installations – Scale up or down your vCPU or GPU resources
You may change the amount of vCPU or GPU resources after your initial deployment depending on your organization’s needs by changing the hosting machine’s instance type. The method will be slightly different depending on if your organization uses Azure or AWS.
If Concept-Level Sentiment is processing slowly, increasing your GPU resources will allow for faster processing. Alternately, you may scale down your GPU resources if speed is not important to you. We recommend discussing these options with your CSM.
To change your machine’s instance type:
- Stop the Daylight application from running using the on-site menu. Note: If you skip this step, Daylight will not run properly after the vCPU or GPU scaling is changed.
- Completely stop the machine that hosts Daylight.
- Change the machine’s instance type to update the amount of available vCPU or GPU resources.
- Power on the machine.
- Start the Daylight application using the on-site menu.
Microsoft Azure
Install Luminoso Daylight On-Site
Background
To use Luminoso on-site for Azure, you must have a valid Azure subscription and Azure Command Line Interface (Azure CLI) installed on your machine. Luminoso provides on-site image(s) per contract, shared with the Azure tenant ID you provide.
Provide the deployment region and tenant ID
Before Luminoso can share an image to your organization, you must provide the following information to your Luminoso CSM:
- Your Azure tenant ID
- The Azure region where you will be deploying the Luminoso on-site image
You must provide this information several business days before you plan to deploy the image provided by Luminoso, so these instructions are here for reference. Your tenant ID is a string of letters and numbers that is separate from your subscription ID.
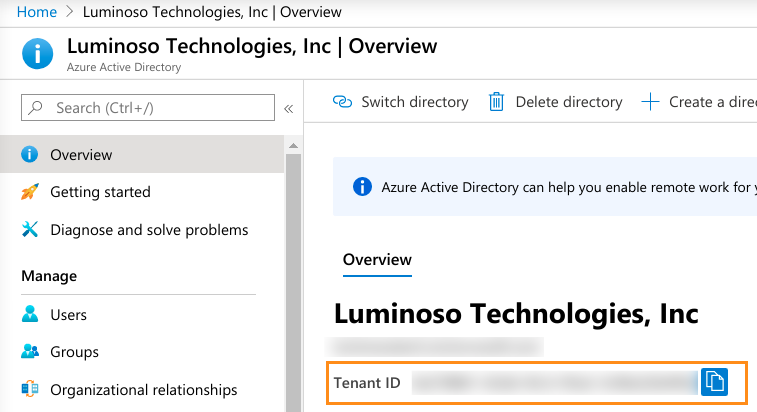
To find your tenant ID
- Inside the Azure Portal UI, open the home page. In the search bar, type “Azure Active Directory” and select it. The Overview page opens.
- Copy the tenant ID displayed under the organization name.
- Provide this ID to your Luminoso CSM.
Set up the Azure Environment for Luminoso VM Deployment
- Click a concept row. The bar expands to display examples of the concept’s use in positive, negative, and neutral contexts, and the concept displays as selected in the Concept details pane.
Tip: If the concept is interesting, save it to access it easily for analysis in all features.
- Remember the Luminoso-client-[client name] in this window. You will need this name to give Azure permission to build a virtual machine. You may wish to write this name down or take a screenshot of the Permissions requested window. If you forget, you can retrieve this name when you open your Azure Active Directory and select Enterprise Applications from the menu.
- From the homepage, open Resource Groups and choose the resource group where you want to create the Luminoso on-site VM, select Access control (IAM), and click + Add. A dropdown menu opens.
- Select Add role assignment. The Add role assignment menu opens:Role — Type and select Contributor.Assign access to: — Leave this as Azure AD user, group, or service principal.Select — Type the Luminoso-client-[client name] you saw in the Permissions requested window and select it when it shows up in the list.When you are done, select Save.
- To confirm that you successfully added the role, click Role assignments from the options under Access control (IAM). You should see the role that you added in the previous step on the list.