Upload the virtual appliance
This document assumes you have the most recent Luminoso on-site image(s) available in your environment. The upload process uses VMware’s vSphere product for transferring the image to vCenter. These instructions were developed using vCenter 6.7. If you’re using a different version of VCenter, your options may be slightly different.
- Log into vCenter using vSphere.
- Right click on the esxi host you would like to deploy to and select Deploy OVF Template… The Deploy OVF Template wizard opens.
- Click Choose File and select the image file. File name format is
[product name]_vmware-version-ID-[client]. For example,_daylight_vmware-1.0-201602221217-acme_. - Click Open.
- Click Next and complete the wizard with information applicable to your environment.
- Review your choices and click Finish to close the wizard. The VM begins to deploy. View the build progress in the Recent Tasks pane.
Create Data Disk
Luminoso’s software requires you to use a disk separate from the OS disk to store all Luminoso data and configuration files. As minimum requirements to run all Luminoso features except Concept-Level Sentiment, we recommend 4vCPUs and 16 GiB of RAM. This minimum is for relatively low workloads. Upgrade your instance size based on workload and performance expectations if needed. Luminoso functionality can only run properly if minimum requirements for the hosting machine are met.
To access Concept-Level Sentiment functionality, you must attach an Nvidia GPU to the Luminoso on-site virtual machine using Luminoso’s tested method. Luminoso cannot guarantee successful Concept-Level Sentiment deployment with any other method.
- Create a data disk and attach it to the Luminoso on-site virtual machine you just deployed.
Attach a GPU using the passthrough method
The hardware and software that Luminoso used for Daylight deployment with GPU enabled:
GPU
NVIDIA GeForce GTX 1080 Ti
Note: Luminoso supports newer generation NVIDIA GPUs with at least 11GB of GPU memory.
Host Platform
ESXi 6.7.0 build 13006603
To enable a GPU as passthrough:
- Click on the ESXi host name.
- Open the Configure tab.
- Expand the Hardware section and select PCI Devices.
- Open All PCI devices, locate your Nvidia GPU, and click Configure Passthrough. An Edit PCI Availability window opens.
- Select both NVIDIA devices and click OK.
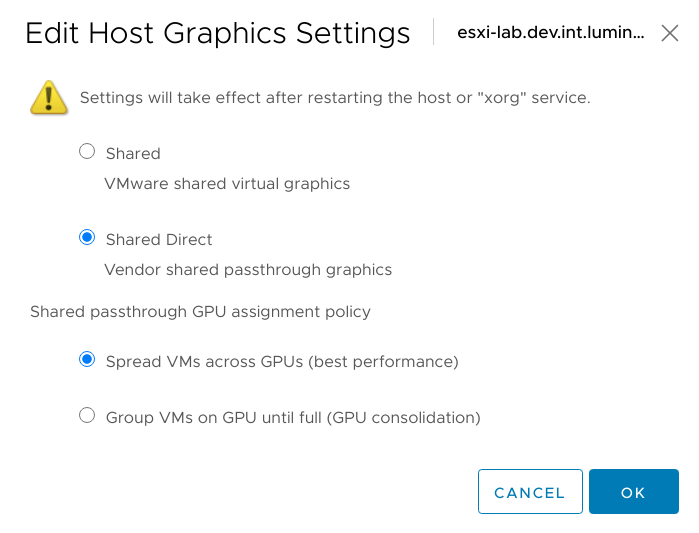
- Under Hardware, click Graphics and select Host Graphics.
- Click Edit. The Edit Host Graphics Settings window opens.
- Make sure your selections match the screenshot above. Click OK.
- Reboot your ESXi host to make your NVIDIA device is available.
- Either right click on your machine or click Actions and select Edit Settings. An Edit Settings window opens.
- Click Add New Device and select PCI Device from the menu.
- In the New PCI device row, select the NVIDIA PCI device.
- Expand the New PCI device row and click Reserve all memory.
- Open VM Options, expand Advanced, locate Configuration Parameters and select Edit Configuration… . The Configuration Parameters menu opens.
- Click Add Configuration Params. In the editor, add:Name = hypervisor.cpuid.v0Value = FALSE
- Click OK to close and save Configuration Parameters and click OK again to close and save your modifications to Edit Settings.
Start the VM
- Right click the VM instance and select Power > Power on the virtual machine.
- Refer to the appropriate Luminoso Daylight on-site product documentation for the configuration steps.
VMware Upgrade Instructions
- Shut down your old machine.
- Deploy a new machine and keep both machines powered off.
- In Storage, under the correct datastore, select the directory of your old virtual machine.
- Select your data disk and click Copy to and copy the data drive from your old Luminoso virtual machine directory to the new one. The copy progress displays in the Recent Tasks pane.
- Right click your new machine and select Edit Settings. The Edit Settings window opens.
- Click Add New Device and select Add Hard Disk. A file explorer opens.
- In the Datastores column, select your new virtual machine. In the Contents column, select the disk you copied from your previous machine.
- Click OK. The File explorer closes.
- Click OK. The Edit Settings window closes.
- Power on your new machine.